How to Lice Comb
Free step-by-step instructions...
Preface:
- Head Lice Combing is safe, natural, and a non-toxic alternative which focuses on the health and well-being of children and families.
- The #1 lice MYTH is that you must use a pesticide to get rid of head lice. This is FALSE. A head lice comb and some know-how is a safe and natural alternative.
- We strongly suggest you read The Science page before starting the steps to empower yourself with knowledge and alleviate anxiety over the unknown. Furthermore, we encourage you first to speak with your health care professional to discuss whether the head lice combing method is right for you.
- The head lice comb can be used on dry or wet hair. We illustrate the “wet” head lice combing techniques used by professional nitpickers and our preferred method.
Lice Combing Steps :
- Lice Combing is NOT hard. New innovative and properly spaced metal lice combs get the job done!
- Follow these 6 steps OR watch our How-To Videos and you’ll be your family’s head lice removal expert too!
Step 1: Tools
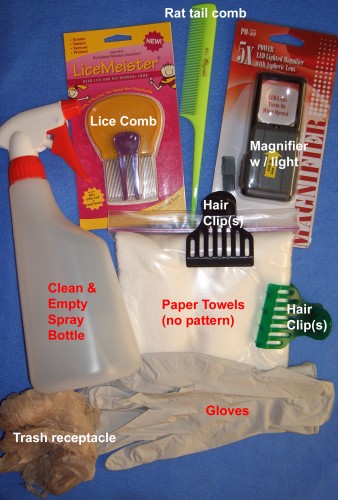
Step 1 : Tools for wet combing
All tools are accessible at your local stores or via the internet.
- Metal Lice Comb (LiceMeister® or Nit Free Terminator®)
- Your personal hair conditioner (not pictured)
- Your personal plastic comb (not pictured)
- White paper towels (preferably with no pattern)
- Trash receptacle
- Lighted Magnifying glass (preferably 5x magnification)
- Empty & clean plastic spray bottle.
- Rat tail comb
- Hair clips
- Disposable gloves
Don’t feel like running around? We’ve done the work for you! Lice Leave™ Lice & Nit Combing Kit!
Step 2: Preparation
-
 Ratio: Approximately 1 Tsp. to 1 cup of tap water. There is no need to be exact.
- Consistency of mixture when sprayed onto hand should be slippery to the touch.
- Add more conditioner if needed.
- Use lukewarm (NOT HOT) tap water to make it more pleasant for the person whose hair is being sprayed.
- Close bottle and shake to mix.
Step 3: Setup
The idea location* is outside with natural lighting IF weather permits (patio covered location).
*We do not recommend you lice comb in your kitchen or around food. Whether you believe reports that lice carry disease or not, take precautionary measures. See The Science page.
Step 4: Combing
Before starting:
- A metal lice comb’s close teeth spacing allows individual hair to be “scraped” to pull/drag out lice and nits, thus it may tug more on dry hair than wet.
- KNOW WHAT TO LOOK FOR:
Click here for video: Louse crawling on hair.


Nit/Egg is an interchangeable term due to common usage.
Louse is singular for lice.


 |
- There is an average of 100,000 hairs on a human head, each a potential place for a louse or a nit to hide. A lice comb is designed to reach larger sections of hair with the added benefit of saving time.
- Although lice can crawl anywhere in the hair, they usually stay close to the scalp where their food supply is located. THE LICE COMB TEETH SHOULD START AT THE SCALP, where newly laid nits and lice are closest, AND RUN TO THE END OF THE HAIR.
- Nits drag off the END of the hair. A removed nit may have a tube-like tail (pictured above) attached to it. This is the glue the female louse released with the nit to attach it to the hair strand. This glue-like substance wraps around a hair strand.
- A certain amount of force (whether fingers or a comb) is needed to drag these nits out of the hair.
The following illustrates the wet hair lice combing approached used by many professional nitpickers.
- On a clean paper towel, spread out your available tools.
- Professionals should wear disposable gloves.
- Dampen hair with premade conditioner and water mixture.
- Comb out ALL tangles with a regular comb (e.g. rat tail comb) BEFORE using a lice comb. Wipe comb as necessary using a clean paper towel to remove excess water/conditioner or if lice are caught.
- Position the LICE COMB slightly parallel to the scalp and comb from the scalp to the end of the hair. Take the biggest “swipes” through the hair to get the live lice out first. You will section later to concentrate on nits. Comb calmly and carefully with the full respect for the sensitivity of a person’s scalp.
- Wipe lice comb on a paper towel after every use so nothing is put back in the hair.
- Although a magnifying glass is not a necessity, it offers the benefit to discriminate what is coming out of the hair. Wiping the comb on a white pattern free paper towel helps with identification so the tiny nits don’t get lost in a color or pattern.
- After taking the biggest “swipes” first, section hair and clip back the excess. Now run the lice comb several times though each section to concentrate on removing nits in each section.
- Once satisfied you have thoroughly combed every section of the head and lice and nits are no longer being wiped off on the napkin from the lice comb, have the person wash out the conditioner.
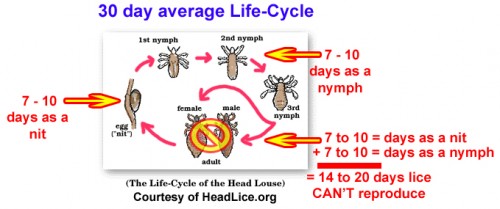
- Repeat the process for the next 14 days. The succeeding days correspond with breaking the life-cycle of lice. See The Science page for more explanations.
- CLEANING AND FOLLOW-UP MUST BE FOLLOWED TO COMPLETE THE LICE COMBING PROCESS.
Step 5: Cleaning
- Home spraying or chemical treatments are NOT needed after a lice infestation.
- It is important to remember that lice don’t fly or hop. They crawl. They can only survive for a limited time (research suggest an average of 2 days) off a human host. Please read The Science page for more information.
- Don’t confuse lice with bed bugs.

CLEANING THE LICE COMB:
- Boil water (enough to completely submerge comb). Turn off heat source once water starts to boil.
- Place lice combs in the boiled water (minimum 130°) for 5 minutes. Water does not have to be a continuous rolling boil. Both the Licemeister® and Nit Free Terminator® combs are made to withstand the heat.
- Once comb is cooled, remove any debris from between comb teeth. The LiceMeister® cleaning tool or unwaxed dental floss can be used to clean comb teeth.
CLEANING THE HOME:
- Vacuuming removes lice/nits from sofas, sofa pillows, stuffed animals, chair backs, backpacks, etc.

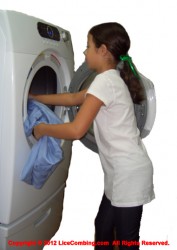
- Generally, a clothes dryer* (20 minutes at the highest heat setting) will kill lice and nits on fabric based items. Please make sure your item can withstand clothes dryer heat, otherwise vacuum it.
*A dryer’s make, model, and/or the amount of clothes in the dryer will affect the time it may take to reach an internal temperature of at least 130 degrees for 5 minutes. Read our FAQ’s on “Will my clothes dryer kill lice and nits.”
- A sticky lint brush roller rolled over a small area (going back and forth 3 or 4 times in different directions) will remove wayward lice and nits. A good lint brush roller is one that will stick to your overturned hand without dropping.
- Many retail hair combs and brushes can’t withstand being placed in heated water. Instead, with gloved hands (if possible) and in an outside location, remove all hair from the brush or comb. Depending on bristle circumference (larger than a strand of hair), lice are not likely to hold on to many retail comb or brush bristles as their “claws” may not be large enough. They will hold on to any stray hairs in the brush or comb. Once all hair is removed, clean brush/comb with soap and water.
Step 6: Follow Up
- Experienced lice combers can get out 95% – 100%. Even if you are new at this you can probably have the same results!
- Maintenance is a VERY important step in getting rid of lice. Missing this step could lead to a false sense of security and the SAME lice infestation reappearing in 2 weeks. It may not be a new infestation, but missed lice or nits now hatching from the old infestation.
- The only way to know if you got all lice and nits out is if you lice comb in subsequent days, 14 days to be exact.
- Follow-up lice combing is a way to check that you did indeed get everything out. You are new at this and are not expected to be perfect. If you don’t pull everything out on the first day, your job is to get everything out in the subsequent days with regular lice combing.
- But why 14 days? In a nutshell, 14 days of lice combing will break the 30 day life-cycle of lice.

- You have a minimum of 14 days to get any nits or newly hatched lice you may have missed during the first initial combings BEFORE they become reproducing adult lice.
- 10 – 15 minutes a day of lice combing is needed. There is no need to spend hours. If a few head lice or their nits come out, don’t panic. You missed a few so spend a little more time carefully head lice combing sections until nothing comes out again. Detangling longer hair will take more time than lice combing.
Read more about the life cycle here: The Science
- A person MAY be lice free after the first lice combing depending on how thorough the combing was.
- Although lice combing continues after the initial day of finding lice or nits, it is our opinion that no child should miss any school if our steps are followed. Please see our FAQs regarding when to send your child back to school.
- If subsequent combing produces a louse or nit, restart counting 14 days after the last find. Again, this is about breaking the life-cycle of lice.
- 14 days of lice combing with no lice lice or nits coming out means the individual is lice-free for that infestation only.
- Getting lice again can happen again. An individual got lice from someone else and they may be going right back in the same environment with a potential to get it again. The beauty of subsequent lice combing is that you will be constantly checking and keeping your family member lice free.
- Nothing will stop an individual from getting lice again so we encourage routine home lice combing to maintain a lice free environment.
Want to keep the family lice free? Click here for Our Optimal Lice Free Maintenance Schedule.


